Monday, September 26, 2005

Instant Instant Oatmeal


If I could brush my teeth with oats, believe me, I would. In fact, I was going to write, "I'd take a bath in them," and then I remembered that I actually have: once when I was covered in a welty poison oak situation, I put oats in the bath, and it was lovely: slippery and soothing in a very porridgy kind of way. Or maybe I'm confusing it with the time the Partridge family got sprayed by skunks and had to bathe in tomato juice? I'm not sure.

Anyway, I know this is not the first oat-based breakfast recipe I've offered you--what with the muesli, and the granola, and the granola bars. But November means hot-cereal season. Well, for the kids and me at least. Not for Michael, who gags at the mere sight of hot cereal. Being the way I am, I like to shovel into his psyche to dig up the roots of this aversion. Was he spanked once with his mouthful of Cream of Wheat? Did he see his grandma naked in the middle of his farina? (That didn't come out right. Not that his nude grandma was actually in his farina, but that she was naked while he was eating it. Which she wasn't.) What? But no. No reason, he says, beyond its "categorical grossness." I see.

He's not alone, I know. When I taught writing classes at UC, Santa Cruz, I the first free-write I used to do with my students was "oatmeal": pen to paper, 15 minutes, whatever the prompt prompts. The students read aloud their ecstatic or revolted memories about comforting blandness or terrorizing glop; oatmeal was school mornings or Christmas morning, pot-stirring mothers in pink aprons or packets torn open alone; someone wrote about Goldilocks; a Latina student wrote of her absolute absence of a relationship to oatmeal; a Chinese-American student wrote about congee. I loved their stories.


And I love oatmeal. I love steel-cut oats cooked overnight in a crock pot; I love my mother's English porridge with cream; I even love those Quaker instant packets that send up an oaty little cloud of dust when you open them. But for me, having this homemade instant oatmeal in a jar is another of my money-in-the-bank food situations: come a chilly morning, the kids can decide to have oatmeal without me standing at the stove or scrubbing a sludge-slicked pot. It's because you grind the oats up fine, which is all instant oatmeal really is, so that they cook on contact with boiling water. And this instant oatmeal is precisely as wholesome as whatever we put in it. Which is mostly oats. But also dates. And brown sugar, because you know me: I'm much more concerned about what a meal does offer nutritionally than what it doesn't. For the sake of all that fibery whole-grain wholesomeness, I'm happy enough for my kids to eat a bit of sugar.

Next, maybe I'll try stapling it into little single-serving paper packets.

Instant Instant Oatmeal
Makes 6 servings
Total time: 5 minutes

You can customize this however you like, of course! Skip the dates and cinnamon and leave it plain--or add in other favorite treats such as walnuts or dried apples (or flax meal--yum!). And you can, of course, omit the sugar and serve it as is or with a bloop of maple syrup or fruit jam. But if you leave out the salt, you will be punished with blandness.

3 cups old-fashioned oats
1/2 cup date pieces
3 tablespoons brown sugar
1/2 teaspoon cinnamon
1 teaspoon kosher salt (or half as much table salt)

In a blender, whir 1 cup of oats with the remaining ingredients until powdered. Now add the rest of the oats and pulse until the oats are mostly broken down. You may need to stop and shake up the blender jar if the oat powder at the bottom is gumming up the works.

To make the oatmeal, pour 3/4 cup boiling water over 1/2 cup of the oatmeal mixture, stir, and let stand for a minute (I usually add a few dried cherries before I pour the water over). Add a few spoonfuls of milk or cream and serve.


Camping and Eating


We couldn't help stealing surreptitious glances at our neighbors during the five days we were camping: there they were, cooking tidily at their stand-up four-burner stove, complete with pot rack, utensil rack, and countertop; there they were washing up pristinely at their wrought-iron wash stand, complete with decorative soap pump and snow-white dish towel; there they were, lighting the dozen or so lanterns that defined the path to their immaculate site. And there we were with our burn-scarred watermelon-print vinyl tablecloth, and the wee camp stove we've used since Michael and I were actual backpackers (i.e. a Godzillian years ago), and our motley assortment of chairs (one of which we rescued years ago from the campground dumpster) and our motley assortment of kids on bikes, kids white rabbiting the smoke out of their eyes, kids with marshmallows in their hair and dirty faces and muddy feet, trying to stay dry while it rained and rained, the enormous drops pelting the tarp like gravel poured from a dump truck.

Oh, but we ate like kings. I can't lie to you. Like kings. It doesn't hurt that every single thing you put in your mouth while camping is the best thing you have ever put in your mouth anywhere ever. That includes the foil-wrapped sandwiches you take to the beach (goat cheese, cucumbers, basil, and harissa for the grown-ups; peanut butter and blueberry jam for the kids), the can of Stop and Shop lemon-lime seltzer you pop open when you return from the beach, the regular old chips and salsa you devour because something about camping makes you feel, ravenously and misguidedly, as though you've exercised, the marshmallow you set on fire and blow out, the beef jerky I made this year and that we all became meatily addicted to, and, of course, the actual meals: soaked oats for breakfast (think: raw granola; think: raw oatmeal), or bacon and eggs for breakfast, smoky from the fire. Or dinner. Dinner is special at the campsite. When the kids were babies, toddling into the road and into the fire and off a cliff and into the pond to drown, peeing their pants every five seconds and choking on large handfuls of pine needles and sand, "special" meant "kill me." But now they're big, and while they merrily play beanbag toss, we prepare actual meals.

Raclette. Mmmm.
One traditional dinner is raclette, which is a French dish: boiled potatoes with sour little cornichon pickles and fire-warmed cheese. Stuck on a clean log near the coals, the cheese goes all unctuously oozy and stinky, and the kids try to roast their stick-spiked hot dogs as far away from it as possible, wrinkling up their noses and screaming "Ew!" every time they imagine they can smell it. Every year, this is the first meal we eat when our friends arrive. Another dinner is foil packets: ground meat and potatoes, or fresh fish, or local veggies, everything sort of steam-roasted with butter over the fire until it goes meltingly soft and smoky. These are called "hobo packets" of course, because nothing is more festive than the culinary arts of the old-fashioned homeless, and they make a fine accompaniment to "hobo pies," which are buttery grilled sandwiches you cook over the coals in a special iron: plain cheese, or mozzarella and tomato sauce for pizza pies, or marshmallows and Nutella for s'more pies. Yum.

There are also lots of instant-ish one-pot dinners you can make over a camp stove, if you can't wrangle a fire into flames in the rain: couscous and beans, or rice and beans (Trader Joe's now has vacuum-packed bags of cooked brown rice, which is a camper's dream come true), for instance, since you don't have to get into any of that pesky boiling and draining of water that pasta requires. And there is always the quick-and-easy hotdog-on-a-stick. I'm going to try to offer you recipes here that might be useful even if you're not camping--recipes that could be made at home during normal life, where every trip to bathroom is not an adventure in entomology and arachnophobia.

Camp Muesli, aka Soaked Oats
Total time: 5 minutes

This is a favorite camp breakfast, but it's also a favorite school-morning breakfast, but usually only when we're out of granola. There is a fresh-tasting chewyness to soaked oats that is lacking from traditional cooked oatmeal, which I am alone in my family in loving. I confess that sometimes I stir a spoonful of wheat germ and flax seed meal into our soaked oats, because that's how I am.

Ingredients:
Oats
Milk
Nuts
Dried fruit
Fresh fruit

For every bowl of cereal, pour enough milk over a half cup or so of oats to cover. Let the oats sit for about 5 minutes to soften, then add nuts (raw walnuts or almonds are our favorites) and dried fruit (cherries, raisins, rolled dates) and fresh fruit to your liking. Birdy likes to add only a little milk to her oats, and then stir in a big bloop of yogurt after soaking, and it's good this way too.

Fish Cooked in Foil
Active time: 5 minutes; Total time: 15-30 minutes

Even if you are not camping (in the pouring rain), try cooking fish this way on your charcoal or gas grill: the fish absorbs some of the smoky flavor while remaining deliciously moist and tender. We happened to be on Cape Cod during Striped Bass season, and the fish we got was out of this world.

Ingredients:
1 large fillet of very fresh fish (1-2 pounds, depending on the number of people you are feeding)
Butter
Salt and pepper
1 lemon, very thinly sliced
Finely chopped garlic (optional)
Finely chopped herbs (we usually use parsley)

Butter a large piece of foil, preferably heavy duty, and lay the fish in the middle of it. Salt and pepper it, arrange the lemon slices over the top, sprinkle with garlic, if you like, and dot with 3 or 4 tablespoons of butter. Now bring the long sides of the foil together at the top and fold over to seal, folding over and over until you are more or less flush with the fish, then pinch and roll the sides to seal.

Cook the fish over hot coals for 7 to 30 minutes, just until it flakes with a fork. I know that's a huge range, but different types and thicknesses of fish and different heat of the coals are significant variables. Here's what we do: every few minutes, we press the top of the fish packet to test the temperature of the fish; once the fish feels warm to the touch, we give it a couple more minutes, and then start testing it for doneness. Garnish the cooked fish with parsley and serve.

Squash Packets
Active time: 10 minutes; total time: 30 minutes

Try other vegetables, if you like, and consider adding whatever seasoning strikes your fancy, such as sliced onions, chopped tomatoes, or spices.

Ingredients:
Olive oil
3 or 4 medium-sized zucchini, halved lengthwise and sliced into quarter-inch half-moons
Salt and pepper
Finely chopped garlic
Finely chopped herbs (cilantro or basil will make an especially delicious packet)
Balsamic vinegar or lemon juice
Butter

For each person (I like to do one per person), spread out a foot or so of foil, preferably heavy-duty, and grease the center generously with olive oil. Add a handful of squash slices, then salt and pepper them, add a bit of chopped garlic, a sprinkle of herbs, a splash of balsamic vinegar or lemon juice, and a spoonful of butter. Fold up the packet as for the fish (above), then cook over hot coals for around 15 minutes, until the vegetables are browning on the bottom and meltingly tender. 

Salted Caramel Popcorn

This is the same as the rosemary caramel popcorn photo. Because I couldn't find another one. I'm so lame.

Salted Caramel Popcorn
This is just so insanely good, and the mix of sweet and salty makes it treacherously hard to stop eating. Install a bigger kitchen sink and double the recipe. Give it away, wrapped in cellophane, in quart-sized metal paint buckets. Note: sometimes I skip the pecans, because I think it's only grown-ups who love them.

10 cups oil-popped popcorn (we pop 1/3 cup of kernels in 1 tablespoon of oil in a Whirly Pop)
1 ½ cups pecan halves or pieces, toasted in a 350 oven for 7 minutes and halves coarsely chopped or crushed with a rolling pin (a good job for a kid!)
½ cup salted butter (1 stick)
1 cup brown sugar
¼ cup Lyle’s Golden Syrup (available at Whole Foods and some specialty stores) or light corn syrup
1 teaspoon vanilla
½ teaspoon baking soda
1 ½ teaspoons kosher salt

Unless you have the world’s largest mixing bowl, begin by giving your kitchen sink a thorough scrubbing and an equally thorough drying (a great job for a kid!), then dump the popped corn and pecans into it. Now, in a small pot over medium-low heat, melt the butter with the brown sugar and syrup, stirring, until the mixture comes to a boil. Boil for five minutes, stirring constantly, then remove from the heat and add the vanilla, baking soda, and salt, and stir vigorously: the mixture will get very foamy and light. Pour it over the popcorn and pecans, and use a wooden spoon to stir it quickly, gently, and well. Now spread it out on a pair of large, rimmed baking sheets, and pop it in a 200 oven for 20 to 30 minutes, until it feels dry to the touch. Cool before packaging. (We package this in large plastic treat bags (from Michael’s), tied festively with ribbon.)

Sunday, September 25, 2005

Yeasted (Croissant-Scented) Waffles

I'm supposed to show them dripping with butter and syrup, but they're so delicious that I'm just showing them like this.

These are simply the best waffles you will ever have eaten in your life, each one as buttery-crisp, delicately tender-hearted, and yeastily fragrant as a croissant--a flattish waffle-shaped croissant. Your house will fill with such a yeasty, tempting aroma that everyone will be summoned from their rooms, hypnotically following the wisps of steam like a pack of sleeping cartoon dogs trailing a fragrant bone. I cannot think of a single person who has eaten them and not proclaimed them the best waffles ever. Although it could be that I ask such leading questions as, "Aren't these the best waffles ever?" I'm not sure. But they are not at all sweet on their own, just so you know and are not surprised by this savory fact.


The original recipe comes, I think, from Fannie Farmer, but I'm not even totally positive about that, because ours is written on the back of an envelope, and I just looked at the front, at the postmark: June 4th, 1999. At which point I would have been four months pregnant with Ben. Coincidence? I know that I was desperate to recreate one of the great culinary experiences of my childhood, which was waking up at my friend Laelia's house and stumbling to the big table in pajamas to wait for the yeasted waffles. Her handsome, gregarious father, whom I loved and maybe was a little in love with, manned the waffle iron right at the table, and he sang and poured batter and teased us and told stories and pulled steaming, golden waffles, while we giggled and chewed and poured syrup and waited for more. And without even trying, I understand that we have recreated almost that entire experience: Michael making waffles at the table while we devour and muster patience and bask in yeasty anticipation and debate the best ways to eat them.

Almost everyone has the first one dead plain (they are that good), and then we part company: Michael favors maple syrup and peach jam; the kids like "everything" waffles, with all the jams  and jellies on the table, plus syrup and, if we have any, Nutella and, if we have any, whipped cream and fruit. But I like them best with just cream cheese, because my other favorite waffle memory is of Curtis Schwartz (a long-defunct Northampton restaurant) where they used to serve onion poppy-seed waffles with cream cheese. Oh gosh, and writing that, I'm remembering a breakfast place in Santa Cruz, where we used to get bacon waffles with the bacon cooked right into them. Insanity. Consider this recipe a fantastic starting place for whatever your imagination or nostalgia or new resolutions suggest.

Yeasted (Croissant-Scented) Waffles
Makes 8
Active time: 5 minutes batter, 30 minutes cooking; total time: overnight plus the other 35 minutes

Okay, this is indeed from Fannie Farmer (I just checked), and the original recipe is called "Raised Waffles" and calls for a full stick of melted butter. Believe me, they are good that way, but I promise they are good this way too. I plan to try making them with some whole-wheat flour, and will report back about how it goes--please do the same. If you have extras, freeze the waffles in a Ziploc and pop them in the toaster for a perfect weekday-morning breakfast. And please note: these do need to be started the night before. Please also note: they really do smell like croissants.

1/2 cup warm water
1 package dry yeast
2 cups milk, warmed
4 tablespoons butter, melted
1 1/2 teaspoons kosher salt (or half as much table salt)
1 teaspoon sugar
2 cups flour (white flour, sigh)
2 eggs
1/4 teaspoon baking soda

The night before you plan to make the waffles, dissolve the yeast in the water, then whisk in the milk, butter, salt, sugar, and flour until the batter is very smooth. Cover the bowl and leave it in a warm place overnight.

In the morning, beat the eggs with the baking soda, then whisk into the batter; the batter will be very thin. Bake according to the directions for your waffle iron, using a hot setting and perhaps a hair less batter than you are accustomed to until you get a sense of the outrageous loft and expansion of these waffles.

Yummy Buttermilk Biscuits


My children feel about any dinner with biscuits in it the way I feel about any movie with Laura Linney in it: however bad it gets, at least there's that. And so a warm, flaky biscuit with butter makes the kids feel very forgiving towards, say, lentil soup, which is what we were having for dinner last night (again). And these biscuits happen to be extra-delicious: crunchy and wheaty on the outside, tender and tangy within. The original recipe is from Deborah Madison's wonderful Vegetarian Cooking for Everyone, a book you should buy or check out of the library even if you're not a vegetarian, simply because she has so many wonderful ideas about making easy, delicious, wholesome meals from inexpensive basics like beans and rice, eggs and cheese. Biscuits fall into this category--a cheap thrill that tarts up even the simplest meal. Oddly, the original recipe calls for all white flour--surprising, since Deborah Madison really seems like a whole-wheat kind of gal--but that's not how I make them. Try using half spelt or whole-wheat flour like I do, not just because it's more nutritious that way, but because it actually gives the biscuits a lovely, warm flavor without turning them into those puck-shaped anvils that seem to dominate the whole-wheat-biscuit genre. Sometimes I go even further, and use all whole-grain flour and, again, the flavor is excellent this way.


There's also the fact that biscuits are a great project to get your kids in on--what with the cookie cutters and the flour everywhere and the simulation of play-doh, only less salt. Birdy pats out dough with such utter sweetness, like it's a baby animal, that I fall in love with her every time. I actually had to put the camera down so that I could grab her and kiss her floury neck. "Oooh," I said. "You're such a pumpkin!" And Birdy said sensibly, with her small hands still pat-pat-patting at the biscuits, "Well, Mama, like you always say, it's not how I look, it's that I act like a pumpkin." I don't know exactly what it means to act like a pumpkin, but "Pumpkin is as pumpkin does" might just become a favorite saying around here.

Yummy Buttermilk Biscuits
Makes a dozen 2-inch biscuits
active time: 20 minutes; total time: 35 minutes

Adapted from Deborah Madison's Vegetarian Cooking for Everyone. If you experiment with the mix of flours, please do let me know how it turns out!

2 cups flour (I use up to 100% spelt or whole-wheat, and they are delicious that way)
2 teaspoons baking powder
1/2 teaspoon baking soda
1 teaspoon kosher salt (or half as much table salt)
6 tablespoons butter (3/4 stick; I use salted), cut into small pieces
1 cup buttermilk

Heat the oven to 450 and butter a large cookie sheet. Now mix the dry ingredients in a large bowl with a fork or a whisk, then add the butter. What you'll see in the photographs is that I do this part in my food processor: I add all the butter, then pulse the machine until it has created an uneven mix of sandy crumbs, with some pea-sized clumps of butter still kicking around. But you can do this by hand too, and that's what I used to do: just add the butter, and toss to coat it with the flour mixture, then take off your rings and use your fingertips to rub the butter into the dry ingredients. This is a messy but not unpleasant job: you’ll be lifting handfuls of the mixture up out of the bowl, then gently letting it fall through your fingertips as you rub it lightly together. Eventually, you’ll have a bowl full of lumpy sandy stuff, which is what you're going for.

Now dump the mix back into the bowl if you used the food processor, and stir the buttermilk in with a fork until the mixture is evenly moistened. Turn the dough onto a floured countertop and press it together a bit--your don't want to handle it more than is necessary--then use your hands to pat it out into a circle that's about three quarters of an inch thick. Use a cookie cutter, biscuit cutter, or drinking glass to cut your biscuits, laying them on the cookie sheet as you go. When you've cut as many biscuits as you can, reassemble the scraps by pushing them together as best you can (if you knead them all up into a ball and then press them flat again, the biscuits start to get a bit tough, which is okay but not ideal--they're more tender if you just kind of shove the scraps together). Cut the rest of the biscuits, then bake for 15 or so minutes until they are golden brown.

I like to brush beaten egg on the tops and add a sprinkle of celery seeds before baking, but my family likes these plain, plain, plain, so that's how I make them, because I am self-sacrificing like that. I know.

Saturday, September 24, 2005

Banana Muffins


When I taught creative writing at UC Santa Cruz, I used to start the semester with a free-write on oatmeal: 15 minutes of pen-to-paper disgorging about comfort and obligation, about the scrubbing of burnt pot bottoms and the brown-sugar smell of home. And I'm thinking that when I teach again, I'm going to do the same exercise, but with bananas.

Find me someone who doesn't have an opinion about them. Really. Birdy bites into a banana with the kind of urgency usually reserved for quenching a long thirst--and I cannot relate at all. Mine is not a revulsion as powerful as our friend Megan's, for whom the specific sight of teeth marks in a banana can send her screaming from the room (this is the same person who gags if she touches a piece of velvet). And yet I can be peeling a banana for Birdy, and when those weird strings get on my fingers, and I try to shake them into the sink and they whip around like alien tentacles, grabbing at my hand and wrist, really I could barf. Or that creepy point that pulls off the top? With the grey thing in it? *Shudder.* I can happily eat a banana only if it is almost green, utterly firm and tangy without the slightest hint of bruised ripeness--especially if it's sliced in a bowl with sour cream and maybe a teeny sprinkle of brown sugar. ("Bananas and smetana" Michael's Grandma Sylvia called that particular dish. *Shudder.*) Which is more often than Ben can stand to eat a banana. Which is never.


And yet Ben and I feel completely different about banana bread. The first summer I lived away from home, for example, I baked banana bread almost every day. I was sharing a tiny apartment with a boyfriend and a friend, and our only baking pan was an old Danish butter-cookie tin and our only cookbooks were Moosewood and The Enchanted Broccoli Forest. Have you ever made that Moosewood banana bread? Oh I loved it. It has tons of butter and tons of unusual flavors: nutmeg and coffee and poppy seeds that you use to coat the buttered tin. The boyfriend probably found it flawed in some or other way ("Is it always so nutmeggy?") but my friend loved it as much as I did. (Then again, this is the same friend who once said admiringly, with her mouth full, "Oh my god, you made this?" And I had to say, "The rice? I did.")

Now, however, Michael is the banana-bread maker in our household, because he is in charge of the bananas. "Are you going to deal with your bananas?" I always say, when their brownness threatens to contaminate everything in the kitchen--and especially the bread--with rotten-banana flavor, and he says, with his perennial good nature, "I am." And so he makes muffins. His recipe is based on one in the Cooks' Illustrated Best Recipe cookbook, and it's excellent: moist and flavorful, crisp-edged but tender, and with just he right balance of banana flavor and a wholesome graininess.

Plus, Birdy loves to mash bananas--a great job for a kid with a potato masher. Oh, but if I were doing that writing exercise right now? I wouldn't write about her mashing bananas like the competent, helpful six-year-old that she is. I wouldn't even write about her first birthday, and the banana cake my mom made her, the one that had the strangest texture--like concrete stirred into pudding and baked. Instead I would write about Birdy as a baby, opening her baby-bird mouth to receive spoonfuls of mashed banana. Every time I spackled some in, she would smile her banana smile and clap her banana hands, her brown eyes sparkling. Then, when she was all done, she would lean up out of her highchair to plant a big sticky banana-scented kiss on my grateful cheek. Oh, bananas! I love you. I do.

Banana Muffins
Makes 2 dozen
Active time: 25 minutes; total time:

Like all muffins, these are best the first day--but they're pretty good the second day too, which is lucky, since this recipe makes lots. The kids bring them to school for snack.

1 1/3 cups white flour
2/3 cup whole wheat or spelt flour
2 tablespoons wheat germ
3/4 cup sugar
3/4 teaspoon baking soda
scant teaspoon kosher salt (or half as much table salt)
3-4 very ripe bananas, mashed (about 1 1/2 cups)
1/3 cup yogurt (we use Stonyfield Farms Banilla, but any fruit flavor is good, as is vanilla)
2 large eggs, beaten lightly
6 tablespoons butter, melted and cooled
1 teaspoon vanilla extract
1 cup pecans, chopped coarse (Michael swears that toasting them isn't worth the bother, but I am secretly disagreeing here: toast them on a baking sheet at 350 until fragrant, 5-7 minutes)

Heat the oven to 350 and grease and flour two regular-sized muffin tins.

In a large bowl, whisk together the flours, wheat germ, sugar, baking soda, and salt.

In another bowl, mix together the mashed bananas, yogurt, eggs, butter, and vanilla. Now use a rubber spatula to scrape this mixture into the dry ingredients, and fold it together, along with the pecans, swiftly but well, just until the dry ingredients have disappeared.

Now fill your muffin tins about 2/3 full: Michael uses his patented "scoop and bloop" method, that involves scooping up some batter on the rubber spatula and scraping it against the muffin tin to fill it. Bake the muffins for 20-25 minutes until they are golden brown and just firm to the touch--or until a toothpick comes out clean. (You don't want to overbake them, obviously, but I want to say that anyway.) Cool in the pan for a minute before you tip them out and finish cooling them on a wire rack.

Whole-Wheat Pasta with Broccoli Pesto and Garlicky Breadcrumbs


I was getting a physical last week--whoa, holy Olivia-Newton-John-with-the-terry-cloth-headband flashback!--and my doctor said, "Oh my god, look at this." A tweet had dinged in from his college-aged son: "Just got mugged!" That was the whole of it. There was no follow-up, and he wasn't answering his cell phone. "Can you believe my life?" my doctor laughed--and no, no I couldn't. I mean, really? Are these kids going to ripple away from us to the very outer edges of our world, lapping at the shores of remoteness and danger, while we call to them, the stone left behind in the center?

We've got a fire popping and fragrant in the woodstove tonight, every candle in the house lit to rage, rage against the dying of the daylight-savings light, everybody safe and cozy, a board-game getting set up even as I write this. I am reckless and greedy as King Midas: ask me this second to make a wish, and I would wish for this, forever and ever. And only years from now, roasting and sweating by our eternal fire in the eternal November evening, setting up Zooloretto for the trillionth time, the children exhaustedly unchanged, would I understand the categorical error of wanting everything always to stay the same.

I'm getting to the broccoli, I am. Because one of the things we can send our kids with into the world is knowledge of how to take care of themselves: how to know when they are tired or hungry or when they've had enough: enough food, enough sugar, enough carnival rides; enough Boone's Farm or company or weird codependent boyfriend. I want them to recognize what it feels like to be rested, healthy, sated, well loved. Sure, they're going to try curing their hangovers with Ding Dongs, and that's fine. But then later in the day I want them to say, "Wow, I could really use something green." I'm serious. I want that.

Which is why we feed them this way: food that is rich and delicious, yes, but that gives the kids that feeling of having been nourished by something substantial. If you have learned to like broccoli, then the world can do you no harm. Right? Right?

Whole-wheat Pasta with Broccoli Pesto and Garlicky Breadcrumbs
Serves 6
Total time: 40 minutes

There's lots of broccoli here--in the form of tender little florets and also in the form of a kind of pesto that's brightly seasoned with my favorite garlic-olive-oil-lemon-zest trifecta. Plus, crunch from the breadcrumbs. Yum. Like most recipes, this one is adaptable: if the combination of broccoli and whole-wheat pasta is simply too challenging, make it with wide egg noodles; if you don't have sun-dried tomatoes, or don't like them, add a few tablespoons of capers or chopped green olives; swap in chopped toasted walnuts for the breadcrumbs; or, if it's all too vegetarian for everyone, broil a couple skinless, boneless chicken breasts, slice them up, and toss them in when you're mixing the final dish. Some whole-wheat pasta is more equal than others--it can be gritty or dusty-tasting or gummy; I love, love, love the brand Bionaturae, and buy lots of it when it goes on sale at Whole Foods.

Kosher salt
1/3 cup sun-dried tomatoes
4 tablespoons of butter, divided use
4 large cloves garlic, smashed and peeled, divided use
1 cup fresh bread crumbs, ideally from whole-grain bread (2 slices)
1 bunch of broccoli
1/3 cup plus 2 tablespoons olive oil (divided use)
2 pinches chili flakes (optional)
1 pound whole-wheat pasta shapes or spaghetti (I used Bionaturae-brand penne)
The finely grated zest of 1 large lemon
1 cup freshly grated parmesan, plus more for serving
1 tablespoon soy sauce

Begin by putting a large pot of heavily-salted water on to boil for the pasta. If you're using the dry-pack kind of sun-dried tomatoes, cover them with boiling water and leave them to soak while you prepare the rest of the ingredients.

Make the breadcrumbs: heat two tablespoons of butter in a medium pan over medium heat and sauté one of the smashed garlic cloves until it's fragrant, then add the breadcrumbs and fry, stirring, until they are crisp and toasted, around 4 or 5 minutes. Leave them to cool in the pan, stirring occasionally so they don't burn from the residual heat.

Trim and peel the broccoli's woody stems, then chop all of it. I quarter the thick stems lengthwise and then slice them crosswise into small pieces; chop the crowns fairly fine, so that you have a mix of small pieces and crumbs. Squeeze the tomatoes to get the water out of them and chop them coarse (if you're using oil-packed ones, simply drain and chop them) and finely chop the rest of the garlic.

Heat 1/3 cup of the olive oil in a wide pan over medium heat and sauté the garlic and chili flakes for a minute or so until it's all super-fragrant. Now add the broccoli and sauté it, stirring frequently, until it is very bright green, then add a half-cup of the salty-hot pasta water and cook, stirring, until the broccoli is tender but still green (you want it fully tender, but not yet turning that unappetizing khaki color that scares everybody). Turn the heat off under the pan.

Put half of the cooked broccoli into a food processor with its cooking liquid, the remaining 2 tablespoons each of butter and olive oil, the lemon zest, the parmesan, and the soy sauce. Whir it until it's smooth, then taste it: it should taste bright and rich and savory. If it's not quite there, add a bit more olive oil or salt or soy sauce.

Meanwhile, you'll have cooked the pasta. (I think a good time to put it in is when the broccoli is done cooking.) In a large bowl, ideally one that's not freezing cold (I use a heat-proof one and pop it in a 250 oven with the plates while I'm cooking), combine the drained pasta with the broccoli pesto, the remaining broccoli, and the sun-dried tomatoes. Serve topped with parmesan and breadcrumbs. 

Tart-Cherry Brownies (Michael's)


Michael is our household brownie baker, and in the course of photographing the baking of the brownies, I realized I didn't know a thing about him. "You use cake flour? Really?" I was incredulous. Who even knew we had cake flour? "You add baking powder? Are you kidding?" Back in the Pleistocene era, when I was the brownie baker, I used no leavening at all. Watching Michael, everything was news to me.

Nothing about me, however, was news to Michael. Like, for instance, the way I'm such a controlling b-yotch.

"So you don't toast the pecans?"

"Nope."

"Not even for a few minutes, just to crisp them up a little and bring out the flavor?"

"Nope."

"Interesting."

"Yup."

My personality can be like mice in the walls of my own life--the way you hear them scratching around and squeaking and chewing up the insulation and you're not sure if they're simply a nuisance or more of an actual problem and you think they're gone but then they're back and there's just nothing to do. But trap them, which is where the metaphor falls apart a little bit, I guess. The other day, the kids were reminiscing, in a comically good-natured way, about various occasions when I've spoken sharply or lost my patience with them. Ben was remembering this one time when he was four--hello, seven years ago!--and he lied about how many episodes of Busy Town he had watched, and then we didn't let him have dessert. I swear this represents the one time we actually punished him, in the classic style of straight-to-bed-without-your-supper punishment, but he ended up hurting his own feelings a little bit, what with his self-sorry nostalgia and all, and then that hurt Birdy's feelings, and she suggested that he should get a little extra dessert right that minute to make up for it. She yanked some candy off of her (very stale) gingerbread house for him, and only later did I think: What a beautiful act of empathy. Because in the moment, all the hurt feelings actually ended up--hello, PMS!--hurting my feelings. "Do you guys just have, like, a catalogue in your heads of all the ways I've ever been lame? And all the billions of nice moments are just pasted over with this handful of bad ones?" And then my hurting my own feelings hurt the kids' feelings, and they came and sat in my lap and petted me. And I felt like a peevish jerk--but a deeply loved one.

But back to the brownies. "Would you really describe those as 'moist fudgy crumbs'? I asked Michael, looking over his shoulder at the batter-coated toothpick, and he shrugged. "No, but I'm calling them anyway. These are done." And they were. And they were fantastic, as always: dense, fudgy, and rich, and studded with tart cherries and pecans that were plenty crunchy and flavorful. Perfect.

Tart-Cherry Brownies
Makes 24
Active time: 20 minutes; total time: 50 minutes

This is based on a brownie recipe from Cooks Illustrated, although the cherries are Michael's addition. The only tricky thing here is figuring out when they're done: the original recipe has you checking them at 20 minutes, at which point they are always still fully molten and not even thinking about being done. Even at 25, they are more liquid in the center than wobbly--I think it's because of the added moisture from the soaked cherries. Start checking them at 25 minutes, but be prepared to bake them up to 10 minutes longer: you want something between a batter-coated toothpick and a clean toothpick. You know: moist, fudgy crumbs. Better to underbake than overbake, IMHO.

1/2 cup dried tart cherries
2 sticks butter (I use salted)
4 ounces unsweetened chocolate           
1 1/3 cups cake flour
1 teaspoon baking powder
1 teaspoon kosher salt (or half as much table salt)
2 cups sugar
4 eggs
2 teaspoons vanilla
1 cup chopped pecans

Heat the oven to 350 and grease and flour a 9- by 13-inch pan.

Soak the cherries: put them in a bowl, cover them with boiling water, and leave them while you prepare the batter.

In a heat-proof bowl over barely simmering water, melt the chocolate and butter, stirring now and then, until smooth. Set it aside to cool.

In another bowl, whisk together the flour, baking powder and salt.

Whisk the sugar into the cooled chocolate mixture, then whisk in the eggs and vanilla, and fold in the flour until just combined. Drain the cherries well, and fold them, with the pecans, into the batter.

Scrape the batter into the pan and bake until the brownies are done. You don't want them wobbly in the center, but you're not looking for them to be totally firm either or they'll be overdone. This is tricky, and will likely take 25-35 minutes (ours were perfect at 33 minutes). Cool in the pan completely before cutting with a plastic knife (Michael swears they don't stick that way). 

Caramelized Brussels Sprouts


Now that so many people cook well, I feel like my kids are actually being deprived of some of life's classic food horrors. Like spinach, which though know more as a tangy salad spiked with crunchy walnuts and tart dried cranberries than as a creamed plate of mess (not that I don't love creamed spinach, by the way, but I know you're not supposed to). Or Brussels sprouts, which people still pretend is commonly dreaded ("Even if you hate Brussels sprouts, you'll love these…") but which, in fact, most children like because they usually get to eat them all crispy-caramelized, instead of boiled into sulfurous mush balls.

So, for instance, on Friday night, we went to our favorite restaurant, where we play dice games and order little stuff off the bar menu. Such as the deep-fried Brussels sprouts, which are so good that the kids are a greasy-handed blur until the giant, heaping plate is empty. They're not battered or anything, just fried until they're all mahogany sweetness and tender-hearted, shaggy-edged crunch. Oh, they are so good.

Bu they're not actually that different from the roasted kind we make at home--which is good, because I'm just not about to bring two quarts of oil to a rolling boil to make Brussels sprouts, if you know what I'm saying (and what I'm saying is: donuts, maybe, or even onion rings, but not Brussels sprouts). If you were to skip the maple syrup and fish sauce, and simply pull the pan of sprouts out of the oven after 25 minutes, you'd have a perfect side dish: the very side dish I've been making for years. However this year, since I blurred two recipes in my mind, I got it into my head to add the maple syrup and the fish sauce. A little sweet, a tiny little but funky: perfection.

Also, I think we should all agree not to go on and on in front of our kids about how Thanksgiving is our favorite holiday on account of how it's just food and togetherness and none of that pesky gift-giving; I watch their stricken faces, and I can see that it just makes them feel so lonely and greedy in their excitement about presents. "What's you favorite holiday, Mama?" they ask, and I say, "Christmas, because it's yours." And I mean it. But if it weren't for them, well. I am a sucker for the food and the togetherness. And the thanks, of course, which I am giving now and always.

Caramelized Brussels Sprouts
Serves 4-6
Active time: 10 minutes; total time: 35 minutes

These are sweet, salty, crispy, tender, and perfect. Of course, you can skip the fish sauce and maple syrup (but don't add one without the other or they will be excessively funky or cloyingly sweet), and simply pull the pan of perfect sprouts out of the oven after 25 minutes. This recipe is easily doubled or tripled; you will need another baking sheet for each batch, and you might want to rotate your pans through the oven halfway through so that they roast evenly.

1 1/2 pounds Brussels sprouts, trimmed and halved lengthwise
1/4 cup olive oil
3/4 teaspoon kosher salt--or 1 teaspoon if you're not using the fish sauce (or half as much table salt)
1 tablespoon maple syrup
1 teaspoon fish sauce

Heat the oven to 425 and line a rimmed cookie sheet with foil or parchment paper. In a large bowl, toss the sprouts with the oil and salt (this is a good job for a child who's not afraid of oily fingers) and arrange them, cut-side down, on the baking sheet.

Bake near the top of the oven for 25 minutes, then return them to their bowl, stir in the maple syrup and fish sauce, and spread them willy-nilly back in the pan. Roast for five more minutes, add which point they should be deeply browned and tender. Serve hot or at room temperature.

Miso Kale Chips


I would like to start by saying that I don't think Sungold tomatoes taste "like candy." I love them, and yes, they're really surprisingly sweet--but Michael and our friend Lydia hover around the plants behind our house, popping tomatoes in their mouths and exclaiming over their candylikeness, and all I can do is roll my eyes. Maybe if there's, like, some kind of a soft, gel-filled, viney-tasting gummy eyeball with seeds, Sungolds are a little like that. "You don't think they're like candy?" Lydia goads. "I can't believe we're even friends." I know. I am the Ebenezer Scrooge of the vegetable world.


Similarly, I never think that corn on the cob is "so sweet it doesn't even need butter." It is often really, really sweet. "Wow!" I might even exclaim happily while the perfect kernels burst under my teeth. "This corn is so sweet!" But I will exclaim only while the melting butter drips down my chin and pools on the plate in front of me. So sweet it doesn't even need butter? That's just crazy talking. That's like substituting applesauce for butter in a cake, and then imagining that it's so "moist and good that I didn't even need to add any sugar!" Okay! Enjoy!

And so, if you are skeptical, what I'm saying is that I hear you. Kale chips? I know. They are not "as addictive as potato chips," if that's what you've been told. Unless the people who told you that were eating potato chips that were actually made out of a kind of seaweedy paper--then, yes! But no, it's not a Pringles kind of a situation. And yet, we have never not eaten all the kale chips within fifteen minutes of their emergence from the oven. They are bizarrely delicious and strangely hard to stop eating: saline and crispy, with a kind of a mild, green flavor that will have you neither on your knees in swooning gratitude nor suffering vegetally. But make no mistake here: it's all about the oil and salt. So please don't start imagining that these are so good they even need any oil or salt! They're not. I promise you. But they are really amazingly good--and almost wildly nutritious, given that it's kale, but distilled into a dense crunch of cruciferous vitamins and antioxidants.

This recipe--one that I dreamed up only because I saw but didn't actually try expensive "miso-flavored kale chips" in a store--is my favorite version: the miso is both salty and sweet, and it gives the chips that Doritos kind of savory-meaty umami that I'm always craving in snack foods. However, I've made them with olive oil and heaps of fresh garlic (the first recipe I ever tried, thanks to our beloved Uncle Barbara), with sesame oil and tamari, and with just oil and salt, and it's all good. Let me know please if you try something different. I am (almost) always open to change.

Miso Kale Chips
Makes about 2 cups
Active time: 5 minutes; total time: 25 minutes

1 bunch of kale, washed well (I used Dinosaur or Lacinato kale for this batch, but only because that's what was at our farm this week; regular curly green kale works great too)
1 tablespoon vegetable oil
1 tablespoon miso (I used a mild white miso)
2 teaspoons balsamic vinegar

Heat the oven to 300 and prepare two rimmed baking sheets by greasing them lightly or covering them with parchment paper.

Separate the kale leaves from their tough stems: I do this by running my hand down the stem, the way you would if you were, um, let me think. No, I guess it's not like anything else I can really say. You could use a large knife for this job, and simply cut down the side of each center rib. Now cut across the leaves to make 1- or 2-inch pieces of some or other shape.

Use a whisk to combine the oil, miso, and vinegar in a large bowl, then dump in the kale and use your hands to coat the pieces evenly with the mixture. Spread it in a single layer across the two sheets and bake until crisp and dry but not black or papery--around 15-20 minutes. The timing is both important and a little tricky, so check it starting at 15 minutes to get a sense of where it's headed and how quickly it's likely to get there. Cool and eat. Store leftovers airtight, I'm thinking, though we have literally not once had any leftovers.

Rosemary Caramel Popcorn


The season is turning, and I love it. Our shelling nuts are out in a bowl with the nutcrackers, beckoning to Birdy like a siren song of fillingness ("Ooof, I ate too many pecans," she says, surrounded by shells like a zoo animal.). The woodstove crackles and steams and blasts out its fragrant heat. The cardinals dart and blush at the feeder. And light is pouring in from the sky around the leafless braches, from our twinkling Christmas tree, from the hush of our menorah. Oh, and the music! We listened to the Pandora Swingin' Christmas station all weekend, and were in corny-favorites heaven. They must have played a hundred versions of "Baby It's Cold Outside," and the line "maybe just a cigarette more," sends the kids into fits of appalled hilarity.

Plus, there's the lovely cold, which only seems to exaggerate our extreme coziness. (New reality show? Extreme Coziness! How many throw blankets will it take to cover them all? How much decaffeinated Early Grey could they possibly drink?) "The stream at school was totally isolated!" Birdy announced on Friday, and we were briefly confused. "Like, they roped off to keep you from going near it?" I tried, and her brow furrowed. "What? No. They didn't care. It was just a little ice anyways." "Aha!" I said. "Icelated, like, covered in ice?" And she said, "Of course--what did you think I meant?"

In a related conversation, she mused aloud about how there should be a kind of rain stick--one of those instrument tubes with the musically clattering beans--only it should be a snow stick that makes the sound of falling snow. Zen, right? I might try marketing it. The silent snow stick. They'd be easy enough to make.

And then there's this popcorn, which reminded Birdy about a project they'd done at school using oils from "Rosemary, peppermint, thyme, and… I want to say… Ontario?" Yes, that's right. Canadian provinces make the most fragrant essences. Our rosemary plant is still staggering along, despite our not bringing it into the warm inside, like it would prefer. It all but presses its piney face longingly against the glass. But I sent Birdy out to pick some, because in this month's Martha Stewart magazine she had a rosemary-scented caramel-corn recipe that looked like the love child of my rosemary pecans and my salted caramel popcorn. I swapped in maple syrup for the brown sugar and corn syrup, added pecans and cayenne (that bit of spicy warmth totally makes it, if you ask me), and chopped the rosemary to distribute it more evenly. And it is about as perfect a snack food as you could ask for: sweet, salty, herbal, spicy, and addictive. We ate all of it while we were trimming our tree. And I hope we got it out of our system, the gorging on the rosemary caramel popcorn, since I'm planning to make more of it for holiday giving, and I'll be so frustrated if we eat it all by mistake. I'm either going to package it in the kind of silvery paint bucket I show here (with cellophane tied around it) or I'm going to package it in new 1-gallon paint lidded paint cans. You can get both at Home Depot, and I love the way they look. Plus, you can seal the lidded paint can, label it, and put it right in the mail, without a box. How cool is that?

Rosemary Caramel Popcorn
Makes 12 or so cups
Active time: 10 minutes; total time: 1 hour

Of course you could omit the rosemary and the cayenne and it would still be divine. But try it this way. The worst that happens is your kids don't like it. And there are worse things than that, if you know what I'm saying. Sadly, my kids loved it.

2 tablespoons oil
1/2 cup popcorn kernels
1 cup pecan pieces, toasted at 350 for 7 minutes
1 stick butter
2/3 cup maple syrup
1 tablespoon chopped fresh rosemary
1/4 teaspoon cayenne
1 teaspoon kosher salt (or half as much table salt)
1/2 teaspoon baking soda

Heat the oven to 250.

Pop the popcorn. As I like to mention at every possible moment, whether or not it's relevant, we are totally in love with our Whirly Pop. We use it nearly every day. Seriously. You should end up with something like 10 cups of popcorn, but you don't need to measure it or anything. Combine the popcorn and pecan pieces in the world's most ginormous bowl, a very large roasting pan (as shown here), or your kitchen sink, that you've scrubbed and dried very well. As we are now the proud owners of an actual roasting pan (thanks again, Mom and Dad!), this is the first time I've not made it in the sink.

Now combine the butter and maple syrup in a medium-sized pot and bring it to a boil over medium heat. Boil it for 5 minutes, or until a candy thermometer shows something approaching 250. (I boiled mine for five minutes, at which point the thermometer was at 240. Fine.) Turn off the heat, and stir in the rosemary, cayenne, salt, and baking soda. It will get delightfully foamy and fluffy and creamy (from the baking soda), at which point you should pour it over the popcorn and pecans. Use a wooden spoon or two to toss it and stir it gently, trying to coat the popcorn as evenly as possible. Pour it onto a large, rimmed baking sheet and bake for 45 minutes (stir it once, gently so it doesn't all flip onto the floor), until it is dry. But it's tricky to tell, because it will feel sticky and oily still while it's hot, so you need to pull a piece out and let it cool for a minute, and then see if it's dry to the touch. If it's still sticky, give it another few minutes.

Cool, then break into pieces and serve or package for giving away. Sigh.

Potato-Leek Soup


Potato-Leek Soup
Serves 4
Active time: 20 minutes; total time: 50 minutes

This soup is so simple and so good, there's not even that much to add here in the introductory note, though I will mention that I usually use boxed chicken broth but instead made it this time with vegetarian bouillon (I had to type that, like, 5 times to get the spelling right) on account of Anni being a vegetarian. I love, love, love this brand--more than any of the boxed broth you can buy. You could, though, use plain water and up the salt a bit to compensate.

3 tablespoons butter
3 leeks, white and light-to-medium green parts, halved lengthwise, sliced into thin half moons, and washed well in a colander
1 1/2 pounds potatoes (ideally Yukon golds), peeled and diced into 1/2-inch cubes
Kosher salt
4 cups broth, water, or a mix of broth and water
1/2 cup milk
Chives for garnish (optional, of course)

Melt the butter in a soup pot over medium-low heat, add the leeks, and stir them as they begin to cook. Ideally they'll have some water still clinging to them: they'll kind of steam and sauté simultaneously, and you can cover the pot to let them get tender (around 10 minutes), stirring occasionally while you prep the potatoes. Now add the potatoes, the broth or water, and some amount of salt (depending on how salty the broth is). Bring the coup to a boil, then reduce the heat and simmer, covered, for half an hour until the potatoes are very tender.

Puree some or all of the soup, using an immersion blender or a regular blender (I use an immersion blender and puree about half of it, since I like to leave some chunks of potato). Stir in the milk and taste the soup for salt: given its great simplicity, it is really important that this soup has enough salt; if it tastes like it's missing something, it is, and what it's missing is more salt. Garnish with chives (if you like) and serve. 

Winter Sunshine Bars


There's been some confusion here about what, exactly, the word "resolution" means. Michael is famous for setting the bar so low that it's pretty much just resting on the floor where you might trip over it and--oh, great!--meet your New Year's goal completely by accident. One year, for example, he resolved not to struggle with inadvertently short lengths of dental floss. "I'm going to throw it away and start with a fresh piece," he vowed, while I committed to such unattainable vastnesses as compassion and generosity. He has decided to practice guitar more--and done so--while I wrestled with the octopus of my own impatience. And for 2010? He's going to make a piecrust before the year is out. It is certainly what they would call in some board meetings "an actionable goal." "Come on then," I said. "I'll teach you. Let's make one right now." Michael looked a little crestfallen. "Well, then I wouldn't have anything to work on," he explained, and I said, "Are you working on the *idea* of making a piecrust?" And he said, "Something like that."

"I'd like to end up with more money," Ben ventured. We were sitting around the dinner table, delineating our goals by candlelight as we spooned up curried turnip soup that was actually better than it sounds, though not much better. "That's more like a hope," I explained, and tried to contain my fear that he's going to be the financiering Alex P. Keaton of our rag-tag little family. "Like something you'd wish while you were blowing out your birthday candles. A resolution is something you commit to working towards." "Hm." Ben thought for a minute. "I guess I want to be better at the piano." "Great," I said. "So, do you resolve to practice more?" Ben grinned and shook his head--the spitting, gorgeous, maddening image of his father. "No, not exactly," he said. "I just want to, you know, be better at it."

Birdy first resolved that our cat stay as cute as he is now. "That's also not a resolution," I sighed, already gumming up my own personal resolution with the sap of impatience. Then she decided to work harder at karate so she can get her yellow belt.

And me? I resolved greater patience and compassion, as always. Also to begin a meaningful practice of community service. Not to compare myself to others. To be satisfied with less. To smile at strangers. I'm sure I'd do better to stick with actionable practices of dental hygiene or, like Ben, to wish for passive impossibilities. I resolve for my moles to look less like shrunken heads! I resolve for the bathroom to become less revolting! But my real final resolution was to eat as locally as possible. With many, many exceptions. "Like lemons, right?" Ben said, because my love of citrus is a well-known fact: the bright smell of lemons and limes, oranges and grapefruits is a kind of aromatherapeutic antidepressant, isn't it? I love, love, love it--especially in the winter, when it's in season. Not here, of course, but somewhere. Like our backyard in Santa Cruz, where the Meyer lemon tree thudded fruit to the ground all winter long, lemons colonizing every surface of our house like fragrant citric barnacles.

So, no, they're not local, this bag of organic lemons that I bought on sale at Whole Foods this week. But what with school looming grimly in the kids' peripheral vision, lemon squares seemed like an act of great compassion. Plus, they're just so outrageously good: perfectly balanced between tart and sweet, between buttery richness and the fragrant slap of citrus. If you make these, resolve to spare a few to pack in the kids' school lunches. Especially if selflessness is on your agenda for the coming year.


Winter Sunshine Bars
Makes 12 bars
Active time: 15 minutes; Total time 1 hour

You could cheat the zest here, and just use the juice and zest of one large lemon. But it's that extra zest--Michael's innovation--that makes these lemon bars uniquely excellent. Which they are.

For crust:
1 cup flour
1 teaspoon kosher salt (or half as much table salt)
4 tablespoons powdered sugar
1 stick unsalted butter, softened

For filling:
1 cup granulated sugar
2 tablespoons flour
1/2 teaspoon baking powder
Grated zest of 2 lemons
1/3 cup lemon juice (around one lemon)
2 eggs, beaten

Powdered sugar for topping

Heat the oven to 350. In a mixer, beat the butter into the flour, salt, and sugar and mix until it forms a bowlful of sandy crumbs. "Really?" I said to Michael. "It's really supposed to look like that?" And yes. Yes it is, apparently. Pat this unlikely-looking mixture into a well-greased 8- by 8-inch pan and bake for 15-20 minutes, until deeply golden.

Meanwhile, whisk together the sugar, flour, and baking powder, then whisk in the lemon juice and zest and the eggs. Whisk until smooth, then pour over the partially baked crust and bake for 25 minutes. Cool, then sift powdered sugar over the top, cut into squares, and eat.

Asian-Style Chicken Salad with Ginger-Miso Dressing


This is the time of year when people who don't do Community Supported Agriculture--aka a "farm share"--are laughing all the way to the Farmer's Market or grocery store. It's late June, you think to yourself. What does our family like to eat? You might choose a lovely quart of strawberries, a dinner's worth of sugar snap peas, and a sweet little head of butter lettuce, and tote it all happily back to your dinner table, confident in the meal you are about to set out for your family. Meanwhile, we of the CSA farm share are lugging home sacks of turnips (The summer's first! Phew, because we are practically running out of our winter-share turnips.) and radishes and patty-pan squash and--the reason for this column--a head of napa cabbage that would make too much coleslaw for a family reunion of giants.


Now, don't get me wrong--our CSA, where we go weekly all summer to pick and pick up our allotted share of produce--is one of my very favorite things ever. So much so, in fact, that two weeks ago, when the children were pissing and moaning vaguely in the car on the way there--probably remembering last summer, when I kept them out in the blasting August heat picking basil for a winter's worth of pesto like highbrow Italian sharecroppers--I spoke sharply to them. "Fresh, local food is a privilege," I snapped, because at 9 and 6 they should really understand by now the politics of agribusiness, industrial farming, and fossil fuel resources. "You should feel honored to pick the food we put on our table. And when we get to the farm, I just want you to say, 'What can I do to help?'" Now every week when we arrive at the farm, instead of the gulag attitudes, the Polyanna parrots children offer a chipper, "What can I do to help?" and I feel like the petty strawberry-picking despot that I am.

But you know what? They do help, the kids, and once they're out there, filling cartons with peas and berries and herbs and flowers, they are chatty and good-natured and way more inclined to eat whatever we bring home. But whatever is really the operative word here. So, for instance, the cabbage: farmy smugness alone is not going to transform that thing into a meal your kids will eat now, is it. No. It is not. What it's like is a game show, where you have to put up a certain amount of your own personal cash, and then you have to run around the store picking out things that you don't know how to cook and that your family probably won't like. Okay, go! Or maybe it's an Iron Chef competition--the "Difficult Vegetables" episode, and all the judges are children. Either way, there was a five-pound head of napa in the fridge, ticking like a bomb exploding its way towards the compost.

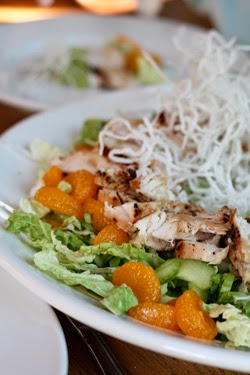
Hence, this salad. Now, should you be so lucky as to not happen to have a mutant cabbage Goliath languishing in your fridge, make this salad anyway, because it's a beautiful, exciting, cool and easy meal, and you and your kids will love it. You can use romaine lettuce instead, or even iceberg lettuce. Or if you have some other crazy CSA-type greens you're needing to be rid of, use those. It doesn't matter. What matters is the miso dressing--which is excellent--and the roasted peanuts and mandarin oranges and crispy noodles, which are the salad equivalent of ice-cream-cone jimmies. Also, not to get all Heloise's Hints on you, but a salad like this is a great way to stretch a couple of chicken breasts into dinner for four. Plus, you'll have plenty of cabbage leftover to make kimchi! Which is what I'm making next. I'll keep you posted.

Asian-style Chicken Salad
Serves 4
Active time: 35 minutes

Don't feel hemmed in by the ingredients list here: If you'd prefer to cut up a rotisserie chicken or a package of 5-spice tofu instead of marinating and grilling the chicken breasts, please do. Likewise, use whatever greens you like (lettuce, say, or spinach) and any other veggies that appeal to you (I would have added sugar snap peas, carrots, jicima, and cilantro, if we'd had them, and I would have added scallions, if my kids wouldn't have spent all of dinner picking them out). And, finally, if you can't bring yourself to deal with the noodles--which I totally understand, since it is the only part of this recipe that is actually kind of a pain--skip them and add more peanuts. It will still be delicious.

For the Salad:
2-3 boneless, skinless chicken breasts (I used 3 here, but 2 would have been fine)
Miso Dressing (see below)
1 small head of Chinese (napa) cabbage (or 1/4 of a K2-sized one)
1 cucumber (I used half of a ginormous shrink-wrapped English one)
1/4 cup roasted, salted peanuts, coarsely chopped
1 11-ounce can mandarin oranges, drained
1 cup thinly sliced celery (two stalks)
1 skein bean thread or cellophane noodles or superthin rice stick noodles (Don't read the directions on the package--i.e. don't soak the noodles in water before using. You want them dry for frying.)
Vegetable oil for frying

Place the chicken in a dish, pour 1/4 cup of the dressing over it, cover it, and let it marinate in the fridge for a few hours, or even just while the grill preheats, if that's all the time you've got.

Meanwhile, quarter the cabbage lengthwise, cut out the hard core, and slice it thinly. Spread it out over a large plate or a very wide salad bowl. Peel the cucumber, cut it in half lengthwise, then scoop out the seeds using a teaspoon or a melon baller. If everyone in your family unconditionally loves cucumbers, don't bother--but this is a worthwhile step for cuke-eaters who are on the fence, since it's the seeds that likely gross them out. Slice the cucumber and arrange it, along with the celery, over the plate of cabbage.

Cook your chicken: if you're doing this on a gas grill, you'll want to heat your grill on high, then turn down two of the burners to medium before you add your chicken. Flip it after a couple of minutes and then, after a couple of minutes more turn those two burners down even more so you can cook it through without burning it, another 5 or 6 minutes--cut it open to be sure. What?  I don’t know. I'm writing this down as Michael is explaining it yellingly from the next room. Cook the chicken somehow until it's cooked is what I'm saying: you could also do this under the broiler if you prefer, or even in a pan. However you've cooked it, let the chicken cool on a cutting board while you fry the noodles.

Heat about 1/2 inch of vegetable oil in a very small pan over fairly high heat. When it is just smoking, drop in a test noodle: it should puff up and turn white immediately. Now add the whole little skein of  noodles, let it puff up, then flip it over and cook the other side, moving it around in the oil to puff as much of it as you can. Drain it on paper towels or a paper grocery bag. Because you are cheating the oil here (I can't bear to heat 2 inches of oil to deep fry an ounce of noodles), you're going to end up with some noodles in the middle that don't puff up. You can either break off the puffed noodles and refry this core, or else just use what you can.

Now dress the greens lightly before arranging the orange slices around them, then the peanuts, then the chicken, which you've sliced. Drizzle the chicken with a little more dressing and, finally, top with the puffed noodles and serve.

Ginger-Miso Dressing
Miso is a Japanese fermented-grain seasoning that's like a cross between soy sauce and library paste and a chorus of angels singing about salt. If what you already have in your life is red miso, try using that, but use less at first since it's even saltier. In a pinch, bottled Annie's Shiitake and Sesame Dressing is a fine way to go, for both the marinade and salad.

1/4 cup white miso (shiromiso)
1/4 cup rice vinegar (unseasoned)
2 teaspoons smashed and then very finely chopped fresh ginger
3 teaspoons sugar
1 teaspoon soy sauce or tamari
1/3 cup healthy vegetable oil, such as canola
1 tablespoon water

Whisk together the miso, vinegar, ginger, sugar, and soy sauce until well blended, then whisk in the oil and, finally, whisk in the water. Taste the dressing on a piece of cabbage or cucumber. Does it seem balanced and good? At a little of this or that if it needs it.

Pink Pink Beet-Walnut Dip


This beet dip is stunningly beautiful and so rich and tangy and wonderful that I will eat and eat it until it is gone. Maybe this encourages the children somehow, my gorging: it becomes so obvious that I'm going to finish this or that dip that they rush in to get their fair share in a kind of chip-wielding survival-of-the-fittest scenario.

Pink Pink Beet-Walnut Dip
Active time: 10 minutes; total time 45 minutes

The sherry vinegar gives the dip a hauntingly deep flavor--a perfect echo of the walnuts--but lemon juice is a good substitute--it makes a fresher and sharper dip. Brace yourself for how stunning this dip is.

Ingredients:
1 pound beets (4 smallish beets), scrubbed
1 cup walnuts
1 clove garlic, smashed and peeled
3 teaspoons sherry vinegar or lemon juice
A few fresh herb leaves, such as marjoram or thyme (optional)
1 1/2 teaspoons kosher salt (or half as much table salt)
1/3 cup olive oil
1/3 cup Greek yogurt

In a small pot of water, covered, over high heat, bring the beets to a boil, then turn the heat down and simmer them until they're tender, 20-45 minutes, depending on their size. I stick a tiny knife in and call them done when I feel no resistance. Drain the beets in a colander, run cold water over them, then relieve them of their stems and skins, which should slip right off now.

Meanwhile, toast the walnuts (a toaster oven is perfect for this) at 350 for five or so minutes until they smell toasty. Let them cool and, if you like, rub them in a dishtowel to remove more of their skins, which can be bitter. Or don't bother. 

In a food processor fitted with the metal blade, whir together the beets, walnuts, garlic, sherry vinegar, optional herbs, and salt, stopping to scraped down the side of the bowl every now and then, until the mixture looks like a coarse puree. With the motor running, slowly drizzle in the olive oil, then whir in the yogurt. Taste the mixture for salt and tang, adding more salt or vinegar as needed, then mound in a bowl and serve with crackers, veggies, or pita chips.