Bar Bark. This is what I was imagining when I was hungrily
lying in bed last night: a candy bark that would be the usual layer of
chocolate, but then covered with every conceivable kind of salty bar
snack--peanuts and corn nuts, wasabi peas, pretzels and goldfish crackers and
Chex mix, even Fritos and barbeque potato chips. How fantastic would that be? I
actually think I'm going to try making some with just barbeque potato chips.
And maybe also corn nuts. And Fritos.
But, somehow, that just doesn't seem like the right thing to
give the teachers at the kids' school: here's this superfreaky chocolate
weirdness that goes really well with a nice big pint of beer!
Anyways: peppermint patties, which have been our go-to
holiday treat on and off for years. I love making them because they have that
nearly magical "we made these?" quality of being the most excellent
version of a thing that is already so beloved even in its store-bought state.
Plus, if I can speak plainly, they're really inexpensive to make--especially if
you already have the peppermint extract. If you don't already have the extract,
it's worth buying because sometimes you might want to put a few drops in your
hot chocolate or your hot fudge. Or maybe you want to make candy canes! Not
that I've ever made candy canes, given that it looks like it takes forever and
results in a not-as-good-as-storebought version of something I don't like to
begin with. (But feel free to prove me wrong! Send me your homemade candy canes
in the mail, and I will post here about the debunking of my foolish beliefs.)
Once you've made your peppermint patties, there's the issue
of presentation. A lot of the dramatic oomph of homemade treats comes, and I'm
sorry to sound so shallow, in the way they're packaged. In an old shoebox with
wads of used tissue paper, they're just not going to delight the same way they
will if you splurge on the take-out containers from Michael's (or, if you're
smart and plan ahead, from the take-out supply company, where it's $5 for fifty
of them) and decorate them with nice labels or stickers and string or ribbons.
I've also had good luck packaging them in clear candy bags with decorated
cardstock tags stapled across the top. I bet you could even stack up a row of
them and wrap them in colorful tissue paper to look like a Christmas
cracker--the kind that pops open to reveal a toy, not, like, a red and green
Saltine--and that would be festive and inexpensive. Silver-paper wrappers would
be nice too, of course, and could evoke that whole York "get the
sensation" sensation you had when the commercials game on in the middle of
the Charlie Brown Christmas Special you were watching.
Let me know if you have other thoughts on these. When I was
working on this recipe for FamilyFun (it's in the November issue, along with a
bunch of other awesome gifts you can make), it was July, and honestly--the
thought of Christmas was almost nauseating. I had to have a fan blowing in the
kitchen so they wouldn't melt while I was making them, and then I had to go to
the Christmas Tree Shop to brainstorm various holiday wrapping ideas. Who goes
to the Christmas Tree Shop in July? Well, lots of people, it turns out, not
just people on funky off-season magazine deadlines. Who knew?
Peppermint Patties
Makes about 3 dozen
Active time: 45 minutes; total time: 1 1/2 hours
These are the addictive classics with a snappy, minted
middle dunked in deep chocolate. Packaged by the dozen in Chinese take-out
boxes, they make perfect no-cook gifts--but first you should whip up a test
batch for yourself just to make sure they're really, really good.
1 1-pound box confectioners' sugar
1 tablespoon shortening
2 tablespoons plus 1 teaspoon water
1 tablespoon light corn syrup
1 teaspoon fresh lemon juice
3/4 teaspoon peppermint extract
10 ounces semisweet or bittersweet chocolate chips
6 Starlight mints, unwrapped and crushed in a Ziploc with a
rolling pin (optional)
Sift the confectioners' sugar into the bowl of a standing
electric mixer and beat in the shortening on medium speed. In a small bowl stir
together the water, corn syrup, lemon juice, and extract, then beat it into the
sugar mixture until combined.
Knead the mixture into a ball (it will be very stiff), then
use the bottom of a glass pie plate and firm, even pressure to flatten the ball
between sheets of wax paper into a 9-inch disk that's about 1/4 inch thick (if
you try doing this with a rolling pin, you will be much more frustrated, I
assure you). Place the disk (with the wax paper) on a cookie sheet and freeze
until firm, around 15 minutes.
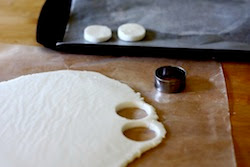
Place the frozen disk on a cutting surface, remove and
reserve the wax paper, and cover the cookie sheet with parchment. Use a 1-inch
round cutter to cut out patties, moving them to the parchment as they're cut.
Gather the scraps into a ball, use the pie plate and wax paper to flatten it
again, and cut more rounds until all of the filling is used. Freeze the rounds
for 10 minutes.
Meanwhile, melt the chocolate in the top of a double boiler
over barely simmering water. Coat the patties one at a time, balancing each on
a fork and dipping (use another fork as needed to flip the patty in the
chocolate), then shaking excess chocolate and scraping the bottom of the fork
against the edge of the bowl before returning the coated patty to the
parchment. Make a ridged pattern one each patty by pressing a fork into the
chocolate and lifting it straight up. Reheat the chocolate as necessary until
all the patties are coated, then allow them to sit until set, about 1 hour.
Optional: sprinkle patties, as they're coated, with the crushed mints.


